Wednesday, November 16, 2011

How to access a private member outside a class


There is a misconception between C# developers that member access specifier like Private restricts the accessibility outside of that class where it is declared.
Today I am going to show you that it is possible via reflection to not only access those private members but you can change and manipulate them as you want.
Here is the link from Microsoft that tells us something about member access specifiers.
Worth noting the definition of Private access specifier

private
The type or member can be accessed only by code in the same class or struct

Alright, Lets jump on to the code to demonstrate how to access private member.
Lets create a Console Application and name it as ReflecitonDemo. Put the solution name AccessingPrivate.
Right click on ReflectionDemo project to add a class. Let's name it as SampleClass.
Type or paste the following snippet into SampleClass

using System;
using System.Collections.Generic;
using System.Linq;
using System.Text;

namespace ReflectionDemo
{
     class SampleClass
    {
        private string privateVariable = "Hey! I am private string variable of SampleClass";
        private String PrivateProperty
        {
            get
            {
                return privateVariable;
            }
            set
            {
                privateVariable = value;
            }
        }
        private string PrivateMethod()
        {
            return "Hey! I am private Method of SampleClass.";
        }
     
    }
}


As you can see this class has 3 private members. A variable, property that uses that string variable and a private method that returns a string.
Double click on your Program.cs file and write/paste the following code in it.

using System;
using System.Collections.Generic;
using System.Linq;
using System.Text;
using System.Reflection;

using Payroll;

namespace ReflectionDemo
{
    class Program
    {
        static string decorator="**************************************************************";
        static void ShowMemembers(object type)
        {
            Console.WriteLine("Showing all the members of " +type.GetType().Name+" class");
            foreach (MemberInfo m in type.GetType().GetMembers(BindingFlags.Instance | BindingFlags.NonPublic|BindingFlags.DeclaredOnly))
            {
                Console.WriteLine(m.Name);
            }
            Console.WriteLine(decorator);
            Console.ReadLine();
        }
        static void InvokePrivateMethod(object type,string methodName)
        {
            //Let's inovke the private method of this class
             Console.WriteLine(decorator);
            
            Console.WriteLine( type.GetType().GetMethod(methodName,BindingFlags.Instance|BindingFlags.NonPublic|BindingFlags.InvokeMethod|BindingFlags.DeclaredOnly).Invoke(type, null));
            Console.WriteLine(decorator);
            Console.ReadLine();
        }
        private static void ChangePrivateField(Object type, string fieldName,object newValue)
        {
            FieldInfo field = type.GetType().GetField(fieldName,BindingFlags.Instance|BindingFlags.NonPublic|BindingFlags.DeclaredOnly);
            Console.WriteLine("Old value of private field: '{0}' of Class {1} is :\r\n  ",fieldName,type.GetType().Name);
            Console.WriteLine(decorator);
            Console.WriteLine(field.GetValue(type));
            Console.WriteLine(decorator);
            
                    
            field.SetValue(type, newValue);
            //Lets see what we did with poor private variable.
            Console.WriteLine("New value of private field: '{0}' of Class {1} is :\r\n  ", fieldName, type.GetType().Name);
            Console.WriteLine(decorator);
            Console.WriteLine(type.GetType().GetField(fieldName, BindingFlags.Instance | BindingFlags.NonPublic | BindingFlags.InvokeMethod | BindingFlags.DeclaredOnly).GetValue(type));
            Console.WriteLine(decorator);
         
            Console.ReadLine();
       
        }
        static void Main(string[] args)
        {
            //http://msdn.microsoft.com/en-us/library/ms173121.aspx

            SampleClass sc = new SampleClass();

            ShowMemembers(sc);
            Console.WriteLine("Calling Private method of SampleClass");
            InvokePrivateMethod(sc, "PrivateMethod");
            Console.WriteLine("Calling Private variable of SampleClass");
            ChangePrivateField(sc, "privateVariable","Your wish my command");

            Console.Clear();
            List<string> list = new List<string>();
            list.Add("Talal");
            list.Add("Khan");
            Console.WriteLine(decorator);
            Console.WriteLine("List count is: {0}", list.Count);
            Console.WriteLine(decorator);
            Console.ReadLine();
            Console.Clear();
            ShowMemembers(list);

            ChangePrivateField(list, "_size",10);


            Console.WriteLine(decorator);
            Console.WriteLine("List count is: {0}", list.Count);
            Console.WriteLine(decorator);


            Console.Clear();

            Employee John = new Employee();
            John.EmployeeId = 1001;
            John.FirstName = "John";
            John.LastName = "Teddy";
            John.Address = "122 Awesome drive, Richmond, VA, 23238";
            John.GetEmployeeSalarybyID(John.EmployeeId);
            Console.WriteLine(John.Salary.ToString());


            Employee Mary = new Employee();
            Mary.EmployeeId = 1002;
            John.FirstName = "Mary";
            John.LastName = "Jones";
            John.Address = "1345 Noway drive, Richmond, VA, 23238";
            Mary.GetEmployeeSalarybyID(Mary.EmployeeId);
            Console.WriteLine(Mary.Salary.ToString());

           
            Employee Talal = new Employee();
            Talal.EmployeeId = 1003;
            John.FirstName = "Talal";
            John.LastName = "Khan";
            John.Address = "900 pump road, Richmond, VA, 23238";
            Talal.GetEmployeeSalarybyID(Talal.EmployeeId);
            Console.WriteLine(Talal.Salary.ToString());

            ChangePrivateField(Talal, "_Salary", 99999.99);
            Console.WriteLine(Talal.Salary.ToString());
            Console.ReadLine();
        }
   }
}

The point of interest in this code snippets are three static methods named
  1.  ShowMemembers
  2.  InvokePrivateMethod
  3.  ChangePrivateField
The names are pretty self explanatory.
Let's jump on these method and see what they does.

ShowMembers Function; This method uses reflection to show only private members of a type that is passed as its parameter.In our above code, we are passing SampleClass type to this method as parameter.
The output if you run the project will show you all the private members defined only in this type, no inherited or child's type members will be shown.
Let's dig into this function line by line.


Console.WriteLine("Showing all the members of " +type.GetType().Name+" class");


This line is self explanatory. This line will display a string on console that says "Showing all the members of SampleClass class".


foreach (MemberInfo m in type.GetType().GetMembers(BindingFlags.Instance | BindingFlags.NonPublic|BindingFlags.DeclaredOnly))
            {
                Console.WriteLine(m.Name);
            }


Ah! The following code snippet is what you need to access the private members of a type. As you can see in this code, reflection is being used to get the type of the type that has been passed as a parameter and then once we found that type, we use a built in function called GetMemebers() which is a overloaded method to return an array of string. This method takes BindingFlags enum type as a parameter. Now that our motive is to get all the private member of this type only, we have to use bit-wise shift operator for BindingFlags.
That's why I have used, Instance, NonPublic(for priavate Members) and DeclaredOnly(only from this type) flag. You can see the details of each flag on MSDN site here.


Guess what, this code will spits out the following output on console.


If you look closely in Sample class we have defined only 3 private members. Private variable,  private property and private method. but the output shows 2 more properties; get_PrivateProperty & set_PrivateProperty. Remember, in .Net a property is nothing but combination of merely a getter and setter function.
Alright, now that we have seen all the private members of this class let's jump to next function called InvokePrivateMethod.


InvokePrivateMethod Function:
This method also uses reflection to invoke a private method. Once you have identified the name of the private function as in our case it is "PrivateMethod", We pass this alone with the object to invoke it.
Let's dig into this code base.


Console.WriteLine( type.GetType().GetMethod(methodName,BindingFlags.Instance|BindingFlags.NonPublic|BindingFlags.InvokeMethod|BindingFlags.DeclaredOnly).Invoke(type, null));


As you can see the above line uses a built in overloaded function GetMethod which uses two parameters, name of parameter and binding flag to reach out that function.
In addition to the binding flags that we discussed previous we have used another binding flag called BindingFlags.InvokeMethod which is used to tell the compiler that this method is to be invoked.
Once we get the required method from GetMethod(), we use Invoke function of MethodBase class to invoke this method and pass the object(in this case SampleClass).
The following is the output on the console.


Did you see, we called a private method named PrivateMethod of class SampleClass. Impressive?


ChangePrivateField Function:
As it name indicates this generic method I have created is used to change the value of any private field in any class. You can see the default value of string (privateVariable) in SampleClass is "Hey! I am private string variable of SampleClass". By calling this method, I am able to change that string to "Your wish  is my command".
Let's see how.


FieldInfo field = type.GetType().GetField(fieldName,BindingFlags.Instance|BindingFlags.NonPublic|BindingFlags.DeclaredOnly);


This code is being used to get the private field of the SampleClass and store the reference in FieldInfo type. Now that we have got the private field, we can get its current value.


field.GetValue(type));


Now, I can see what you are thinking. If you can get the value, can we set the value? Sure, why not.
There is method called SetValue that you can use to change its value.


field.SetValue(type, newValue);


As you can see, this method expect two parameter, the object to which this field belong and new value.
Here is the output of this method on the console.


Now that we have learned how to manipulate these private field. Do you want to try this technique to some of the classes shipped with .Net such as List class?

Alright then, lets declare a list of string and add 2 string to that list as show below.


Console.Clear();
List<string> list = new List<string>();
list.Add("Talal");
list.Add("Khan");
Console.WriteLine(decorator);
Console.WriteLine("List count is: {0}", list.Count);
Console.WriteLine(decorator);


The output of this code should be 2. No tricks in there.
Now lets call ShowMembers function and pass this list object to that method.
You will get a list of all the private members as expected. Now that I pick _size variable from those private members list. 
This is private variable of type int which Count read-only property uses to display you the count. I want to mess with it. I want to change the count from 2 to 200. Can I do that? Well before reading this article you probably would say No. But now your answer would be yes.
Call ChangePrivateField with list object, _size as fieldName, and 200 as new value.


 ChangePrivateField(list, "_size",200);


Now output the count again.


Console.WriteLine(decorator);
Console.WriteLine("List count is: {0}", list.Count);
Console.WriteLine(decorator);


What did you see? 200 or 2 :)
Okay fair enough, you can now play with any type that has reflection permission on it or the type's code is not obfuscated. 
Cheers.

Source Code

Tuesday, February 23, 2010

Hosting Https SSL WCF as a Windows Service

There may have various reason where you opt to host a SSL WCF service as Windows Service compare to IIS. One of those reason is  existing TCP service for internal folks and now you want to expose it to a web. Well, ideal way is to open another https endpoint. Now a general consensus among developers is TCP should be hosted in Windows service and HTTP(S) in IIS. So now that you have two endpoints TCP and HTTPS, IIS 6.0 and below doesn't fit your need.
Plus, you have a service hosted on windows service, running under TCP for a long time, well tested and doing good its job. This is the ideal scenario where you need this path.

Alright, without wasting a single minute on it, let jump to the code. In order to accomplish this task, you need the following ingredients.
  1. A WCF that has been secured by Transport Layer Security mode.
  2. A Windows Service to host this service.
  3. Server, client and trust root certificates for trust chain.
  4. Httpcfg.exe utitly.
  5. A client, console application that uses client certificate to call this secure service.
If you don't have these ingredients, please read this tutorial from this point. Otherwise jump to the section "Configuring HTTPS WCF Service with Httpcfg.exeutility".

Creating aWCF Service
Create a new C# Class Library project. Name it as Service. Since you arecreating a new Project, a new solution will also be created. Select the location of thisproject/solution file and rename the solution WCF or something of your own choice.
Click OK.


Let’s quicklyrename the Class1.cs file to something like Calculator in Service project. Make sure the classname also changes to Calculator.


Don’t forget to add System.ServiceModel.dll as areference to Service project as shown below.


Now let’s addcouple of methods in it such as Add () and Subtract (). Pretty basic, huh?
Please copyand paste the following code in your Calculator.cs to save time.


using System;

usingSystem.Collections.Generic;
using System.Linq;
using System.Text;
using System.ServiceModel;
namespace Service
{
   [ServiceContract]
   public classCalculator
   {
       [OperationContract]
       public intAdd(int x, inty)
       {
            returnx + y;
       }
       [OperationContract]
       public intSubtract(int x, inty)
       {
            returnx - y;
       }
   }
}


Note: You can create your own WCF by any mean, but for this tutorial please follow the one.


Okay. Now at this point we have created a simple WCFservice that has 2 methods for Addition and Subtraction.
Let’s now Create a Windows Service that will host thisWCF service.
Right click on your WCF solution file and select Add New Project then select Windows Service.


Alright now we have 2 projects in our solution. First oneis WCF service and 2nd one is Windows Service.
Hosting WCF serivce under Windows Service
Double Click on Service1.cs file in WindowsServiceproject go open the file in Design mode. Then right click on design mode andselect Add Installer as shown in the figure below.


This actionwill bring 2 components as shown in the following figure.
Note: Don’t forget to add areference of CalculatorService and System.ServiceModel in your WindowsService.


Ok now let’scome back to the code and rename Service1.cs to something meaningful; umm likeCalculatorService.cs. Now open up the code editor of CalculatorService.cs bydouble clicking and paste the following code in your CalculatorService class.


public partial class CalculatorService : ServiceBase
   {
       private ServiceHosthost;
       public CalculatorService()
       {
            InitializeComponent();
       }

       protected overridevoid OnStart(string[]args)
       {
            try
            {
                if(host != null)
                {
                    host.Close();
                }

                host = newServiceHost(typeof(Service.Calculator));

                host.Open();
            }
            catch(Exception ex)
            {
                throwex;
            }
       }

       protected overridevoid OnStop()
       {
            if(host != null)
            {
                host.Close();
                host = null;
            }
       }
   }


This codeis simply creating a service host for type calculator WCF service referenced inour project.
Before weinstall this windows services let’s do some tweaks to the installer files.
First ofdouble click on ProjectInsaller.cs file to open it in Design mode and thenclick on ServiceProcessInstaller1 component.
Press f4 tosee its properties if not shown by default. Change the Account property fromUser to LocalService.
Now Click onServiceInstaller1 and change the following properties.
ServiceNamefrom Service1 to CalculatorService or something meaningful.
StartTypefrom Manual to Automatic.
Display namefrom empty to Calculator Service or something meaningful.
Description:  A robust calculator or whatever you want.

Till now,we havecreated a service and its host but we really didn’t write ABC of our service.Most importantly we didn’t make our service SSL secure. So let’s do it. Butbefore we jump into it, we are missing some important things, "certificates"!
Creating and Configuring Certificates
Since this tutorialis about hosting a SSL service as windows service, we probably need server andclient certificates signed by a trusted certificate authority like VeriSign or Thwart.  To get certificates from these authoritiesfor development or learning purpose is not only costly but time consuming tooand is not recommended.
How to make client and servercertificate by using MakeCert .exe command.

If you wantto reinvent the wheel you can go to these link and create your own CA, Serverand client certificates. Otherwise you can use one of mine provided with thissolution to save your time.
If you areusing the certficiates which are provided with this solution, be sure to importclient and server certificates to Personal Folder. If you don’t know how to doit read below for step by step instructions.
How to import certificates to appropriate folders
  1. Log on to the system as an administrator.
  2. Click Start, click Run, type mmc, and then click OK.
  3. On the File menu, click Add/Remove Snap-in, and then click Add.
  4. Under Snap-in, double-click Certificates, click Computer account, and then click Next.
  5. To manage certificates for the local computer, click Local computer, and then click Finish. .
  6. Click Close.
Certificates(Computer Name) appears on thelist of selected snap-ins for the new console.
  1. If you have no more snap-ins to add to the console, click OK.
  2. To save this console, on the File menu, click Save.
  3. Click on(+) sign to expand the Certifcates tree.
  4. Right click on Personal Folder and follow the steps to import Server.cer and Client.cer Certificates.
  5. Right click on Trusted Root Certification Authorities to import Our Certificate Authority.cer

Note: Thepassword for the certificate’s private key for both client and server is 1234
Alright, nowwe have created and imported these 3 certificates. Be sure that client andserver certificates should have private key with them as shown in the followingfigure.


Right clickon WindowsService Project and click on Add à New Item. Let’s add App.config.


Alright, I amgoing to configure my service based on config file as compared to write code.But you are free to choose whichever way you want to.
Since theintent of this tutorial is to teach how to host a SSL WCF service as a windowsService and not to teach how to create a windows service, I am skipping the ABCof WCF. You are free to write your ABC or copy one from the below.


<xml version="1.0" encoding="utf-8" ?>
<configuration>
 <system.serviceModel>

   <behaviors>
      <serviceBehaviors>
        <behavior name="OurServiceBehavior">
          <serviceCredentials>
            <clientCertificate>
              <authentication certificateValidationMode="ChainTrust" revocationMode="NoCheck"
                trustedStoreLocation="LocalMachine" />
            clientCertificate>
            <serviceCertificate findValue="24d7ac65704bc0a161cc2539d22ad2916f5cf4b0"
              storeLocation="LocalMachine" storeName="My" x509FindType="FindByThumbprint" />
          serviceCredentials>
          <serviceMetadata httpsGetEnabled="true" />
        behavior>
      serviceBehaviors>
   behaviors>

   <services>
      <service behaviorConfiguration="OurServiceBehavior" name="Service.Calculator">
        <host>
          <baseAddresses>
            <add baseAddress="https://localhost:8022/CalculatorService" />
          baseAddresses>
        host>
        <endpoint address=""
          binding="wsHttpBinding" bindingConfiguration="SecureBinding"
          contract="Service.Calculator" />
        <endpoint address="mex" binding="mexHttpsBinding" contract="IMetadataExchange" />
      service>
   services>

   <bindings>
      <wsHttpBinding>
        <binding name="SecureBinding" closeTimeout="00:010:00"
          openTimeout="00:010:00" receiveTimeout="00:10:00" sendTimeout="00:010:00"
          bypassProxyOnLocal="false" transactionFlow="false" hostNameComparisonMode="StrongWildcard"
          maxBufferPoolSize="524288" maxReceivedMessageSize="65536" messageEncoding="Text"
          textEncoding="utf-8" useDefaultWebProxy="true" allowCookies="false">
          <readerQuotas maxDepth="32" maxStringContentLength="8192" maxArrayLength="16384"
            maxBytesPerRead="4096" maxNameTableCharCount="16384" />
          <reliableSession ordered="true" inactivityTimeout="00:10:00"
            enabled="false" />
          <security mode="Transport">
            <transport clientCredentialType="Certificate" proxyCredentialType="None"
              realm="" />
          security>
        binding>
      wsHttpBinding>
   bindings>

 system.serviceModel>
configuration>


Let’s walkthrough couple of snippets in this configuration.


Services Element:


This aboveconfig snippet will create a WCF service “Service.Calculator”whose address is http://localhost:8022/CalculatorService. It means that service only exposes a singleendpoint on SSL available at https://localhost:8022/CalculatorService. Although you can expose anotherendpoint which is unsecure for internal connection like TCP. The services uses wsHttpBinding and which uses SecureBinding as a configuration (willbe discussed below).
The servicealso exposes another endpoint called mexat the address which exposes metadata i.e. WSDL.
There isanother property called contract which is in this tutorial is a class and notan interface. Please remember that this is not a WCF design session ortutorial, that’s why I have skipped many of industry standards orrecommendations here.


Bindings Element:


You guysprobably are familiar with bindings so I am not going to discuss it in depthexcept the security element of this.
This is the elementthat defines whether the web service is secure or not, if it is secured thenwhich mode it is; Transport layer security (TLS/SSL) or Message Based Security(MBS). We are using TLS with Certificates and no other, username, windows etc.
Until now wehaven’t actually made our service secure. We need to provide a servicecertificate. Which server will present to client to prove its identity at thetime of security handshake. Let’s jump on that section.


Behaviors Element:


Okay, so thissection defines the behavior of the service. How should the service behave?
First let’sdiscuss the following elements inside behavior tag.


ServiceCertificate Element:


This tells WCF that go find the certificate from My store of LocalMachine location. The finding method is finding it bycertificate thumbprint whose value is 24d7ac65704bc0a161cc2539d22ad2916f5cf4b0.

This sentence will be translated by windows as go find thecertificate in Personal Folder of Computer Account location whosethumbprint value matches 24d7ac65704bc0a161cc2539d22ad2916f5cf4b0

How to get certificate thumbprint:
Now for thosepeople who don’t know how to get thumbprint I can show you by taking extrapain.
Double click on your Our Servercertificate in the personalà Certificates Folder. Click on 2ndtab Details and scroll all the way down, youwill see thumbprint as shown the figure below.


I could have search the certficate by other means, subject name,expiration date, issuer etc but I prefer thumbprint as this is unique for eachcertficiate.
Note: Did you see that I have pasted thumprint without spaces? Veryimportant.
ClientCertificateElement:


Client Certificate Element:


Now what doesthis script telling us? This is merely saying 3 things. When client tries toconnect service, it will present WCF service a certificate. WCF service has to trustthe certificate chain which is present in its LocalMachine location in windows certificate store. Also you don’t need to checkonline whether the certificate has been revoked or not at this stage.
If you haveimplemented PeerTrust instead of ChainTrust, the scenario will bedifferent. In that case you must have installed client’s public key certificatealong with its chain of issuers in your server certificate stores inappropriate folder. Similarly, the client have to install server public keycertificate along with its trust chain in client’s computer‘s certificatestores in appropriate folders. Also in this case, the config file will slightlychange and you have write configuration tofind client certificate. Same code have to be written in client’s config tofind the server public cert. 

Installing the Service
Installation using installutil.exe:
Let’s installour service now and see if it is working or not. You can create a setup projectto install or use the following method which I am using to install thisservice. This is quick way to install and debug the issues as compared to setupproject.
Installutil.exeis use to install and uninstall windows service that serves an efficient toolin development.
Go to theVisual Stuido 2010 command prompt and type the following command to install theWindowsService.


Oppose to theabove command you can use installutil /u [exe path] to uninstall the service.


Alright,after installing the service go to the Services component under Control Panel--> Administrative tools-->Services or you can type services.msccommand in the run dialog box to open this quickly.


Starting the service:
See ourcalculator service is installed and ready for running. Click on Start to runthe service.
Go tointernet explorer and type the following address in the browser.
Hmmm... Whywe aren’t getting the WSDL? Yes we have enable https metadata in server config.Also we have provided the correct certificate chains, thumbprint, behavior anddouble check everything else. What is the problem now?
Configuring HTTPS WCF Service with Httpcfg.exeutility
This is heartof this tutorial. We forgot to configure the port (8022) with a X.509certificate. Why? Here is an explanation from MSFT.
Ok, now thatyou have understood the necessity of this command line tool. Let’s start tobind our certificate to the port.
For windowsXP, For Vista and Windows server 2008 you would have get netsh.exe which is outof scope of this tutorial.
Note: Ifin future the download location of httpcfg.exe changes, you can always get itfrom the solution zip file I am providing you.
Okay, nowlet’s open up windows command prompt and go to the directory where httpcfg.exeexists. In this case it is in c:\blog\httpcfg.exe.
Type thefollowing command to see how many ports are bound to X509 certificate and theone you are using is not in there.


C:\Blog> httpcfg query ssl


In mycomputer only 1 port 8021 is bound to some X509 certificate whose hash (Thumbprint)is not the one which our certificate has. So no problem
Let’s configure 8022 port to the server certificate whosethumbprint is 24d7ac65704bc0a161cc2539d22ad2916f5cf4b0

The commandfor binding the port to Cert is


C:\Blog\WCF> httpcfg set ssl -i0.0.0.0:8022 –h 24d7ac65704bc0a161cc2539d22ad2916f5cf4b0–f 2


If you receivethe following message it means you are successful.
HttpSetServiceConfiguration completedwith 0.

Let’s queryagain to see how many ports are bound to which certs and if 8022 is one of themor not.


Do you seethat? We have configured port 8022 with the Server certificate whose thumbprintis same we are using in our server app.config.
Good deal.Try browsing the URL again.


Click on ViewCertificate button. Yes it is the server certificate that we have provided toWCF.


Click on Okbutton followed by Yes button tocontinue. You will probably see this page, but don’t worry about it as ourserver certificate is not issued to this machine name. Click on continue to this website (not recommended) link.


Aha! Here wesee our secured https WCF service hosted as windows services exposing itsmetadata in a WSDL.


Here is theWSDL screen shot.


Good deal,isn’t it?
Creating WCF Client:
Ok now thatservice is running we want our clients to connect to it. Let’s make a simpleconsole application client which will call this service to achieve the goal.
Right clickon solution file-->Add-->New Project and select Console Application. Rename the projectas Client and press ok.
Next step isto add a service reference. Right click on Client project and click on Add Service Reference.
Type thefollowing address to add a service reference and click on Go button.
Note: Ifyou receive an error warning from Visual Studio that says “Visual Studio hasdetected a problem with site’s security certificate”, please ignore it by clickyes.

Click okbutton add this as a service reference.
Note: Did yousee Visual Studio automatically creates app.config file with a bunch of configelements in it? This is the magic of VS that is only available to .Net developers.


Double clickon Program.cs file in Client Project to write the following code snippet.

CalculatorService.CalculatorClient proxy = newCalculatorService.CalculatorClient();
Console.WriteLine("The Result of Addition is:" +proxy.Add(2, 2));
Console.ReadLine();

Okay folks itis time to hit F5 (if client is your startup project).
Did you getthe following picture too? If not then you are doing something wrong.


Well ofcourse it was expected, how does VS know which certificate you want to provide?
Yes, weforgot to write configuration to provide client certificate. Remember wealready created and imported a client certificate into our personal folder?
Again, thereare 2 ways to achieve this goal, via coding and via configuration. I opt in forconfiguration.
Let’s add thefollowing configuration snippet in your app.config in Client Project.


<behaviors>
        <endpointBehaviors >
          <behavior name="SecureEpBehavior">

            <clientCredentials>
              <serviceCertificate>
                <authentication certificateValidationMode="ChainTrust"/>
              serviceCertificate>
<clientCertificate
findValue="5491c10dcf012c91008a6b2857b3bd2c13ab9791"
storeLocation="LocalMachine" storeName ="My" x509FindType="FindByThumbprint" />
                        clientCredentials>

          behavior>
        endpointBehaviors>
behaviors>


Don’t forgetto add this behavior name “SecureEpBehavior” in behaviorConfiguration elementin tag as highlighted below.


<client>
            <endpoint address="https://localhost:8022/CalculatorService/CS"
                binding="wsHttpBinding" bindingConfiguration="WSHttpBinding_Calculator" behaviorConfiguration="SecureEpBehavior"
                contract="CalculatorService.Calculator" name="WSHttpBinding_Calculator" />
        client>


The fullconfig file will be shown as below.


xml version="1.0" encoding="utf-8" ?>
<configuration>

  
    <system.serviceModel>
      <behaviors>
        <endpointBehaviors >
          <behavior name="SecureEpBehavior">

            <clientCredentials>
              <serviceCertificate>
                <authentication certificateValidationMode="ChainTrust" trustedStoreLocation="LocalMachine" revocationMode="NoCheck"/>
              serviceCertificate>
              <clientCertificate findValue="5491c10dcf012c91008a6b2857b3bd2c13ab9791"
                storeLocation="LocalMachine" storeName ="My" x509FindType="FindByThumbprint" />
            clientCredentials>

          behavior>
        endpointBehaviors>

      behaviors>
     
        <bindings>
            <wsHttpBinding>
                <binding name="WSHttpBinding_Calculator" closeTimeout="00:01:00"
                    openTimeout="00:01:00" receiveTimeout="00:10:00" sendTimeout="00:01:00"
                    bypassProxyOnLocal="false" transactionFlow="false" hostNameComparisonMode="StrongWildcard"
                    maxBufferPoolSize="524288" maxReceivedMessageSize="65536"
                    messageEncoding="Text" textEncoding="utf-8" useDefaultWebProxy="true"
                    allowCookies="false">
                    <readerQuotas maxDepth="32" maxStringContentLength="8192" maxArrayLength="16384"
                        maxBytesPerRead="4096" maxNameTableCharCount="16384" />
                    <reliableSession ordered="true" inactivityTimeout="00:10:00"
                        enabled="false" />
                    <security mode="Transport">
                        <transport clientCredentialType="Certificate" proxyCredentialType="None"
                            realm="" />
                        <message clientCredentialType="Windows" negotiateServiceCredential="true" />
                    security>
                binding>
            wsHttpBinding>
        bindings>
        <client>
            <endpoint address="https://localhost:8022/CalculatorService"
                binding="wsHttpBinding" bindingConfiguration="WSHttpBinding_Calculator" behaviorConfiguration="SecureEpBehavior"
                contract="CalculatorService.Calculator" name="WSHttpBinding_Calculator" />
        client>
    system.serviceModel>
configuration>


Let’s try onemore time by press F5. This time we should see a message that we have neverseen as shown below.


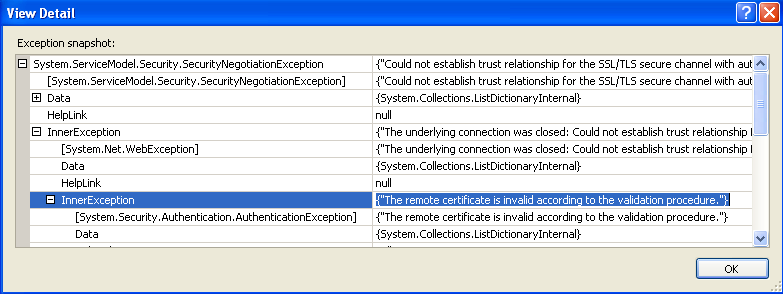
Now what? Ifyou click on View Details… under Actions: Go to InnerException and go to InnerException of this InnerExcepiton.You will see a message that says “Theremote certificate is invalid according to the validation procedures” asshown in the following picture.


You probablywill be wondering something is wrong with our server certificate or chain trustor method of validation and the doubt goes on and on until you get frustratedwhy on earth this message is coming. Well there is nothing wrong with ourcertificate except a minor problem with Certificate name that was not issued tothis machine or you can say that doesn’t resemble to this machine name.
And thatmakes completely sense, since you are in development mode and the server orclient certificate that you got is for production computer, if otherwise youget certificate of each environment. So how do we resolve this? Well there is aconfiguration that you need to put on top of your client configuration file sothat WCF doesn’t check for the certificate name anymore. Here is thatconfiguration snippet.


   <system.net>
      <settings>
       <servicePointManager checkCertificateName="false"/>
     settings>
    system.net>

So ourcomplete updated client app.config will look like below.


xml version="1.0" encoding="utf-8" ?>
<configuration>
  <system.net>
    <settings>
      <servicePointManager checkCertificateName="false"/>
    settings>
  system.net>

  <system.serviceModel>
    <behaviors>
      <endpointBehaviors >
        <behavior name="SecureEpBehavior">

          <clientCredentials>
            <serviceCertificate>
              <authentication certificateValidationMode="ChainTrust" trustedStoreLocation="LocalMachine" revocationMode="NoCheck"/>
            serviceCertificate>
            <clientCertificate findValue="5491c10dcf012c91008a6b2857b3bd2c13ab9791"
              storeLocation="LocalMachine" storeName ="My" x509FindType="FindByThumbprint" />
          clientCredentials>

        behavior>
      endpointBehaviors>

    behaviors>

    <bindings>
      <wsHttpBinding>
        <binding name="WSHttpBinding_Calculator" closeTimeout="00:01:00"
            openTimeout="00:01:00" receiveTimeout="00:10:00" sendTimeout="00:01:00"
            bypassProxyOnLocal="false" transactionFlow="false" hostNameComparisonMode="StrongWildcard"
            maxBufferPoolSize="524288" maxReceivedMessageSize="65536"
            messageEncoding="Text" textEncoding="utf-8" useDefaultWebProxy="true"
            allowCookies="false">
          <readerQuotas maxDepth="32" maxStringContentLength="8192" maxArrayLength="16384"
              maxBytesPerRead="4096" maxNameTableCharCount="16384" />
          <reliableSession ordered="true" inactivityTimeout="00:10:00"
              enabled="false" />
          <security mode="Transport">
            <transport clientCredentialType="Certificate" proxyCredentialType="None"
                realm="" />
            <message clientCredentialType="Windows" negotiateServiceCredential="true" />
          security>
        binding>
      wsHttpBinding>
    bindings>
    <client>
      <endpoint address="https://localhost:8022/CalculatorService"
          binding="wsHttpBinding" bindingConfiguration="WSHttpBinding_Calculator" behaviorConfiguration="SecureEpBehavior"
          contract="CalculatorService.Calculator" name="WSHttpBinding_Calculator" />
    client>
  system.serviceModel>
configuration>


Try pressingF5 now. I am positive you will the screen below if you have followed thetutorial thoroughly and didn’t miss or skip any step.


Happy ending :)
Source Code